How To Build A 12 Gallon DWC Tote | Parts List | #Hydroponics
How To Build A 12 Gallon DWC Tote | Parts List | #Hydroponics
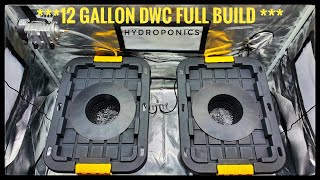 Here’s I’ll show you how to build a 12 gallon dwc tote for hydroponic growing. I also linked below all the parts you’ll need to build this unit. I really hope you enjoy this build and follow me on my new journey of growing indoors. Please don’t forget to Subscribe and Share this video to your friends. Thank and have a good day..
Here’s the parts list to build this 12 gallon DWC..
6″ Net Pot..
12 Gallon Tote..
https://www.menards.com/main/storage-organization/storage-totes-bins/storage-totes/centrex-plastics-reg-tough-box-reg-12-gallon-black-storage-tote/12gtbvltcb-blk/p-1456889246212-c-12667.htm?tid=-6227734152720805122&ipos=11
2″ x 12″ Air Stone..
950 GPH Air Pump..
1/2″ Elbow Connector..
1/2″ Grommet..
Carbide Hole Cutter..
1/4″ Drill Bit..
Air Line Tube..
Blue 1/2″ Tubing..
Drywall Circle Cutter..
7/16″ OD x 10′ Clear Vinyl tubing..
https://www.menards.com/main/plumbing/rough-plumbing/pipe-tubing-hoses-fittings-accessories/hoses-tubing/vinyl-tubing/sioux-chief-7-16-od-x-10-clear-vinyl-tubing/42143510/p-1444442680692-c-8584.htm?tid=3444428529927333218&ipos=10
Check out some of these awesome channels:
Pepper Joe’s info:
Website: https://pepperjoe.com
Facebook: @pepperjoe12
Instagram: #pepperjoes
Youtube: https://www.youtube.com/channel/UCwKf…
CB’s Greenhouse and Garden
https://www.youtube.com/channel/UCk5W82ixPGjFfVdYx3WfV7A
Here’s the link to these Ultra Yield
7 Pot Club
https://www.youtube.com/channel/UCMKH_yo-lhyCdj4fJlQnYjQ
Chillichump
https://www.youtube.com/channel/UCSdNragfmbW_bqzUYBKIK_A
Khang Starr
https://www.youtube.com/channel/UC_eVg568w02BmZWDCrgunvg
My contact info:
Facebook Group.. Joe’s Pepper House
https://www.facebook.com/groups/2503138413095839/
Instagram.. #joespepperhouse
Email.. joe@joesbbqhouse.com
Joe’s BBQ House info:
Facebook.. Joseph Sanfratello
Facebook Group.. Joe’s BBQ House https://www.facebook.com/groups/2179456012284608/
#indoorgrowing #dwc #hydroponics #growyourown #howto #growshop #gardening #urbanfarming #horticulture #hydro #hydroponic #marijuana #urbanfarm #organic #garden #hidroponik #weedporn #coco #hydroponicsystem #haveagoandavagrow #plantnutrition #nevertooldtolearn #hightimes #weed #plantnutrients #kenthydro #hydroponicsuk #avagrow #learnsomethingneweveryday #kenthydroponics #bhfyp #gardening #hotpeppers #hotsauce #fermenting #sevenpot #indoorgrowing #peppers #hotsauces #fermentedhotsauce #hydroponic #growlights #pepperjoe #dwc #rdwc #growtent #superhotpepper #seeds #carolinareaper #habanero #scorpiontrinidad #jalapeno #chilipeppers #bellpepper #chilipeppers #scotchbonnet #sereno #tabasco #chilihotsauce #netpods #netcups#joespepperhouse
Painfully slow to watch
I have a question. I’m gonna try my first hydro grow in a 5 gal bucket.
So when you have to add water do you just add water or water and nutrients?
Also I’m confused with when feeding. I can’t remember if says once or twice a week to feed whatever it is that means you have to change out the water each feeding or you can add it to your bucket and check ph? I guessing you just add it because the plant ate most of it?
Also the bigger container you have won’t the food last longer? Just trying to prevent burning them with nutrients.
What about food safe plastic?
thought I was going to have a seizure during that replay part.
Get a pair of tin snips to cut the hole in the plastic for the netty pot, you’ll thank me later. I use them for vinyl siding, same material.
I,,.,’ve seen that head before. Oh ya when I look in the mirror. Lol
A drimle and a small cut wheel does wonders! Paint ur lids white black absorbs heat just my cents…nice rig tho.
Anyone else think he coulda just flipped the net pot over and traced the bottom instead of doing all that measuring and drawing
great video, i will restart my indoor grow. I’m watching videos to update myself, as it’s been over 20 years since I’ve been planting, but now I want to be able to taste what’s best and made by me.
Joe, I’m told we are alike….
Very well explained and demonstrated. Also great equipment chosen. This is my first time running a homemade DWC bucket and it works pretty well too. But because of your video, I’m seriously considering making 2 boxes. Thanks for sharing and greetings from Austria!
hi , where can i find a specific netpod for dwc ? if anyone have a link , it will be VERY apreciated ty
great diy vid. keep it simple-one thing i found was the air lines coming off the manifold need to be the same length regardless of how many buckets you use manifold-air stone Same length, and putting the pump in a cardboard box will cut down the noise alot- have fun !!!
Fantastic tutorial thank you, Great build well done.
veryinformative, but you freaked me out your lights went off in video at exact same time my two aerogardens shut off for the night :))
Can you do more than 1 plant in a bigger tote?
Do you change your water and nutrients and let it drain out the site hose or what
Seems like only red 1/2" tubing is available. Any good substitutes elsewhere for 1/2" blue tubing? Did you go with a colored one instead of a clear one to block out possible algae growth from light?
The center paper stuff was not necessary because the lid of the tote had perfect alignment with the squares. The center of the center square was your middle point. Great setup!
Nice vid explains in good detail good job Ty
Hi what pump size whould I require for a RDWC or every how many minutes should it take for my total volume to circulate the system?
Really cool I’ve been getting into growing my own crop indoors and am eager to learn alternative growing techniques. This is a very nice thorough explanation of a simple build similar to what I’ve been researching. I was wondering, though, what is that thing you connect the clear tubing, from the air pump, to the air stone tube. I’d also like to know what you grew in these things and how well it did in there after all this time since you posted the video if you don’t mind me asking
Thanks that was good but bro have you herd of snips? The green or red sometimes yellow or blue being red right, green left, and yellow or blue straight and then you can get slimish looking design or the other type that are much wider well they actually cut perfect circles with a bit of practice they must be good quality good condition and they cut paper plastic metal and everything in between. I only thought id mention because you had everything else just about and I just don’t know what I’d do without my snips and cutting perfect holes:)
That is one gnarly looking hole lol. Nice video tho, making a hole that big in these totes is such a pain in the butt. Interesting seeing how each person deals with it differently.
if you are growing tomatos in the 12 gallon how do you change the water
You can take it a step further, instead of building it out of a tote you would build it out of a coleman etc. ice cooler. It would keep the water temperature cooler more stable for root growth. If your water temperature gets close to 80F you’ll get root rot and other diseases. You can also throw a bottle of frozen water into it to cool it down. That’s the biggest issues DWC growers have growing inside a grow tent. The tent heats up as well as your water, you can always buy a water chiller $$$. There’s also a product called "Botanicare Hydroguard " just add it in your water, which will save and protect your roots. Also the more air stones you have, the better for root growth. I’ve also have an aquarium sponge filter in mine, just to keep my water clean as possible.
Good job! Great advice.
Thank you sir for the tutorial! Man that stone is awesome. Never seen one move that much bubbles and water! Happy growing to you sir and best of luck!
I was under the impression you needed that air gap im considering building a rdwc nyslef nice vid very Informative growmie

Haha just got to the part with the hole, use a hole cutter?
That’s the hard way to cut a hole in the top of the grow box container! The easy way is to get a hole saw blade that’s the correct size for the netpots. Sometimes that means buying a holesaw blades from Internet sites that sell in metric sizes that give a tighter fit for the netpots than the standard english sizes that are more easily available at local stores.
The easy way to drill a clean hole through plastic tops, with clean edges, every time, is first drill a small pilot hole in the forward clockwise direction. Then drill the large hole with the hole saw blade in the reverse counter clockwise direction. When you buy your hole saw blades, you have to make sure that they are designed so that they are designed to stay in the drill, when drilling in the reverse counter clockwise direction. Some hole saw bits won’t stay in the drill when you drill in the reverse counter clockwise direction.
It’s best to select a grow container that has a smooth flat top, where the large holes will be drilled. Not a corrigated top as shown in this video. When you drill the large holes with the large holes with the hole saw bits in the reverse counter clockwise direction, the edges of the hole will be nice and smooth every time.
For holes large than six inches, use a black five gallon bucket, and a bucket top with a preformed very large netpot, which are available from hydroponic stores.
Is this in a 2×4. If it is I’m gonna build it! Lol
I suppose if you do not have a circle cutter you could use a protractor.
I use the same totes but I used epoxy to attach the top 5 inch pieces of a 5 gallon bucket to raise the net pots up above the tote lid to keep from losing water volume. would not recommend do it the way I did if you are restricted on height though.
A little bit of over kill with that air stone But your little me the bigger and more bubbles the better What did you pay for that air stone Don’t think I can’t afford that air stone Im going to to try a 8 inch air stone disc I am disabled could someone send all the parts to you and pay you do get one ready to go and pay to ship it to me I just can’t put all the fitings on and drill and cut and all that stuff
wow, great video lots of info, and prices with links… you’re the man Thanks !!
You should place your air pump out side of your tent so its not blowing hot air in your buckets
I bought a 13/16 paddle bit, drilled the hole and the 1/2 grommet falls right thru. The hole is to big
I bought the same hole cutter and it ended up being too big for the grommet but only slightly. What can I do to fix this? Please help!
Please do a weed grow tutorial
That system is a nightmare.
Brother you have a phenomenal dome!!! Thanks for the great video. I’ve made many many of DWC systems and this is wonderful for the beginner trying to get growing in hydro!
Hey awesome build I love it. I imagine it yields big plants. How often do you have to drain the water
Could you not have found a tote with a flat lid? Would have made cutting it a lot easier.
What pump is that?
My question is: Do you know how many times did you use the words "you guys"?
How big is your tent?
Sir I’m from scottland wwg1wga can u please help me with were I can by buckets to make a dwc sisstem and we’re were can gt cheep lights don’t waste electric sir hope u can help a Scottish brother out
(4) 5 gallon pots would up efficiency…
You have enough pressure to add 2 more bubblers…
A jig saw would cut the hole in 20 seconds
That airstone could keep Moby Dick alive